Evidence-based articles on beginner fitness routines, home workouts, healthy eating, weight loss, and mental wellness. Free calculators and tools included. For real people in the US, UK, and Canada.
Stop risking injury. Learn the correct Smith Machine shoulder press form from Dorian Yates’ technique. Build bigger delts with these 7 expert tips.
For decades, the Smith machine has been a staple in gyms from Los Angeles to London. While it sometimes gets a bad rap compared to free weights, the Smith Machine Shoulder Press remains a favorite among bodybuilding legends and beginners alike for one simple reason: it works .
Six-time Mr. Olympia Dorian Yates famously switched to the Smith machine shoulder press due to the sheer danger of getting 160-pound dumbbells into position . Meanwhile, 2024 New York Pro winner Nick Walker calls it one of his top two favorite exercises for shoulder hypertrophy .
Whether you are in the US, UK, or Canada, this guide will teach you how to use this machine to build strength, avoid injury, and maximize muscle growth.
The Complete Smith Machine Shoulder Press Guide
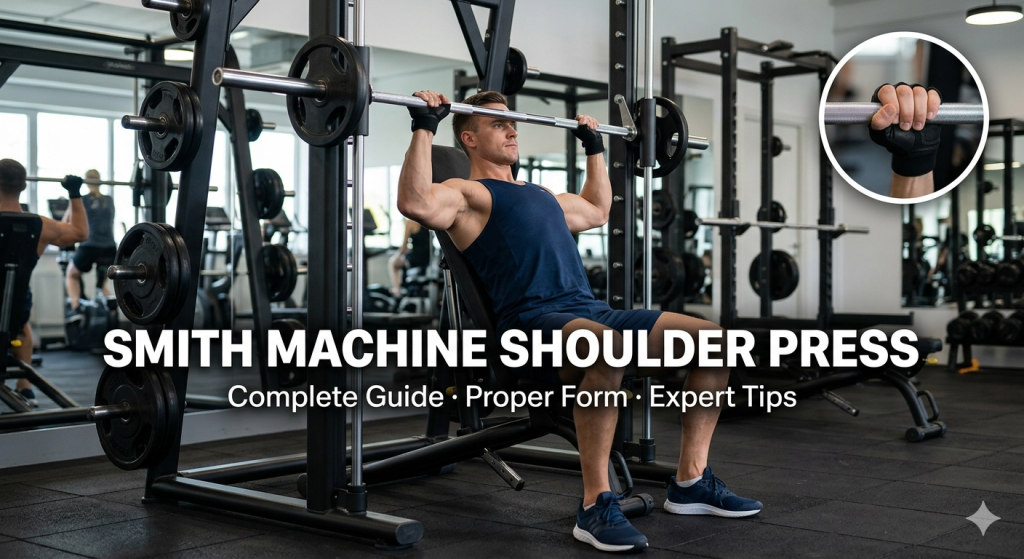
Smith machine shoulder press proper form with elbows at 45 degrees
What is the Smith Machine Shoulder Press?
The Smith machine shoulder press is a variation of the overhead press where the barbell is fixed on steel guides, allowing it to move only vertically (or in a fixed path) . By performing this move seated on an adjustable bench, you can isolate your deltoids without worrying about balancing the weight.
It is an ideal tool for “mastering” the press, as the stability allows you to focus purely on pushing heavy weight
Muscles Worked: What Gets Built?
While it primarily targets the shoulders, this exercise recruits a solid support team:
- Anterior Deltoid (Front Shoulder): The primary mover. This muscle does the heavy lifting to bring your arm into flexion above your head .
- Lateral Deltoid (Side Shoulder): Assists in the movement and contributes to that wide, “capped” look .
- Triceps: They fire up to extend your elbow as you press the bar toward lockout.
- Upper Back & Core: These stabilizers work to keep your shoulder blades set and your spine braced against the bench .
Why Use the Smith Machine? Key Benefits
If you are training in a busy gym in New York or a home gym in Manchester, the Smith press offers unique advantages.
1. Safety and Stability
The fixed bar path means you don’t need to stabilize the weight, making it far safer for lifters who don’t have a spotter . The safety stoppers catch the bar if you fail, allowing you to push to failure without fear .
2. Beginner Friendly
Learning to overhead press with a barbell can be intimidating. The Smith machine allows beginners to build confidence and strength in a controlled environment while still effectively targeting the major muscle groups .
3. Hypertrophy (Muscle Growth) Focus
Research suggests that when it comes to building muscle size, machines are just as effective as free weights . In fact, a 2020 study indicated that the Smith machine may create better muscle activation in the target muscles because it stabilizes the bar for you, allowing you to focus tension on the delts rather than supporting muscles .
4. Accessibility
Traveling for work? Staying at a hotel with a small gym? Smith machines are everywhere. They are a staple in commercial gyms, apartment fitness centers, and cruise ship gyms, making this exercise a reliable option no matter where you
Smith Machine vs. Free Weights: Which is Better?
This is the million-dollar question. Should you stick with the Smith machine or grab the dumbbells? The answer depends on your goals .
| Feature | Smith Machine Shoulder Press | Free Weight (Barbell/Dumbbell) Press |
|---|---|---|
| Stability | High – Fixed path, no balancing needed. | Low – Requires stabilizer muscles and core engagement. |
| Safety | Safer for lifting alone; safety stops catch the weight. | Riskier without a spotter, especially near failure. |
| Muscle Recruitment | Isolates the delts; less stabilizer activation. | Engages more total-body muscle for control . |
| Range of Motion | Fixed vertical path (may not suit all anatomies). | Natural arc, usually more comfortable for shoulders . |
| Best For | Hypertrophy, beginners, lifting to failure. | Functional strength, athleticism, shoulder health. |
The Verdict: You don’t have to choose just one. Many pros, like Jennifer Dorie (Bikini Olympia Champion), use the Smith machine for heavy compound work and then switch to dumbbells or cables for isolation
Want boulder shoulders without the shoulder pain? The Smith machine shoulder press might be your secret weapon. Here’s how to do it right—with tips from Dorian Yates and the latest science.
Let me tell you about the first time I tried to build my shoulders with heavy dumbbells.
I was young, eager, and completely ignorant of the danger. There I was, lying back on a bench with a 40-kilogram dumbbell in each hand, trying to kick them into position without tearing my rotator cuff. It was awkward, it was wobbly, and honestly, it was pretty terrifying.
Turns out, I was in good company.
Six-time Mr. Olympia Dorian Yates faced the exact same problem. In a recent Instagram post from August 2024, Yates shared footage of his legendary “Blood and Guts” training from the 1990s, explaining why he eventually switched from dumbbells to the Smith machine for shoulder presses .
“I would’ve continued to do them had it not become quite dangerous to actually get the 160-pound dumbbells into position before even beginning to press,” Yates explained. “I had my training partners pass me up a dumbbell each, and it became a bit too awkward and dangerous” .
If one of the greatest bodybuilders of all time found the Smith machine shoulder press to be a safer, more effective option, maybe it’s time we all reconsider this underrated piece of equipment.
First, Let’s Talk About Why the Smith Machine Gets a Bad Rap
Walk into any gym, and you’ll hear the whispers. “Smith machines are cheating.” “They don’t build stabilizer muscles.” “Real lifters use free weights.”
I’ve heard it all. And honestly, there’s a grain of truth in some of these criticisms. The Smith machine does lock you into a fixed path, which means your stabilizer muscles don’t work as hard as they would with a barbell or dumbbells .
But here’s the thing: not working stabilizers as hard isn’t always a bad thing.
When it comes to shoulder presses, the anterior deltoid—the front part of your shoulder—is the primary mover . The Smith machine stabilizes the bar for you, which allows you to focus all your tension on that target muscle. A 2020 study suggested that this increased stability might actually lead to better muscle activation in the primary muscles, since your body doesn’t have to divert energy to balancing the weight .
Research has also concluded that there are no differences between free weights and machines regarding hypertrophy benefits . In plain English: you can build just as much muscle with machines as you can with free weights.
So before you dismiss the Smith machine as a beginner’s tool, consider that legends like Dorian Yates and seven-time Mr. Olympia Arnold Schwarzenegger both incorporated it into their routines . Even reigning two-time Bikini Olympia champion Jennifer Dorie prefers the stability of the Smith machine for her overhead pressing, specifically because it minimizes shoulder injury risk .
What Muscles Does the Smith Machine Shoulder Press Work?
Understanding which muscles you’re targeting helps you perform the exercise with better mind-muscle connection.
Your shoulder, or deltoid, has three major regions :
Anterior deltoid (front shoulder) – This is the power player for all overhead press variations. It’s responsible for shoulder flexion—raising your arm up in front of your body. The Smith machine shoulder press primarily targets this muscle group .
Lateral deltoid (side shoulder) – This muscle assists in the movement and contributes to that wide, capped look. It acts as a stabilizer during overhead pressing .
Posterior deltoid (rear shoulder) – Located at the back, this muscle also helps stabilize your shoulder blade as it moves during the press .
Supporting muscles – Your triceps extend your elbow during the second half of the movement, while your abdominals and lower back help brace your spine against the resistance .
A 2013 study found that the Smith machine shoulder press produced the highest activation of the anterior delt compared to other shoulder exercises . That’s impressive.
How to Perform the Smith Machine Shoulder Press: Step-by-Step
Let’s walk through the correct form. The devil is in the details here.
Step 1: Set Up Your Bench
Place an adjustable weight bench inside the Smith machine. Set the backrest to about 80 to 85 degrees—almost vertical, but not quite . You want the bar to have enough space to travel in front of your face .
Step 2: Position Yourself
Sit down and position yourself so that when you reach up, the bar is just below arm’s length overhead . A common mistake is setting the bar too low, which forces you to start in a weak position.
Step 3: Grip the Bar
Grasp the bar with an overhand grip, palms facing away from you, slightly wider than shoulder-width . A grip that’s too narrow can strain your wrists; too wide reduces your range of motion.
Step 4: The Unrack
Twist the bar to disengage the safety hooks. Hold the bar overhead with your elbows soft—not locked—and your core engaged .
Step 5: The Descent
Inhale, tuck your chin slightly (imagine the bar missing your nose), and lower the bar in a controlled manner until it reaches just below your chin or passes eye level . Don’t go too low if you feel any shoulder discomfort.
Step 6: The Press
Drive the bar back to the starting position by pushing through your shoulders. Exhale as you press. Keep your elbows directly under the bar throughout the movement . Don’t lock your elbows violently at the top; keep tension on the shoulders.
The Pro Tips That Make All the Difference
I’ve gathered these insights from years of training and from experts who know their stuff.
Tip 1: Lower the Bar to Ear Height
For maximum front delt tension, lower the bar to about ear height . This ensures you’re working through the full range of motion where the anterior delt is most engaged.
Tip 2: Press at 30 to 45 Degrees
Keep your arms and elbows at approximately 30 to 45 degrees in front of you relative to your torso. This is called the “scapular plane,” and it’s the natural position for your shoulders . Pressing straight out to the sides can impinge your rotator cuff.
Tip 3: Watch Your Elbow Position
Your elbows should stay directly under the bar at all times. If your elbows drift behind the bar, you’re creating a poor joint angle that can lead to injury .
Tip 4: Know Your Smith Machine
Some Smith machines have a slight angle; others are perfectly vertical. If yours is angled, ensure you’re pressing back and up, not forward and down. Some experts even recommend tilting your bench slightly to match the machine’s angle .
Tip 5: Keep the Bar Close to Your Face
Position the bench so the bar travels close to your nose or chin. If the bar is too far in front of you, you’ll lose power and shift tension away from your shoulders .
Common Mistakes That Will Sabotage Your Shoulders
Avoid these at all costs.
Mistake 1: Excessive Back Arch
If you’re arching your back like you’re doing a bench press, you’re turning your shoulder press into an incline press and putting unnecessary stress on your lower spine . Keep your upper back pressed into the pad.
Mistake 2: Cutting the Range of Motion Short
Partial reps rob you of gains. If your flexibility allows, lower the bar to just below your chin . If you can’t do this without pain, work on your mobility before adding weight.
Mistake 3: Looking Up at the Ceiling
Tilting your head back excessively strains your neck. Tuck your chin slightly to make room for the bar, but keep your gaze mostly forward .
Mistake 4: Flared Elbows
Elbows pointing straight out to the sides put your shoulders in a vulnerable position. Keep them at that 30-45 degree angle we talked about.
Mistake 5: Using Your Legs to Push
This isn’t a leg press. If you’re using momentum from your legs to move the weight, you’re not effectively targeting your shoulders . Drop the weight and focus on form.
Why the Smith Machine Might Be Perfect for You
Let’s look at the unique benefits that make this exercise worth your time.
It’s Beginner-Friendly
Overhead pressing is a fundamental movement, but learning to do it with a barbell can be intimidating. The Smith machine is safer and more comfortable for most beginners . You can focus on the pushing motion without worrying about balancing the weight.
It’s Safe and Stable
The fixed bar path means you don’t need to stabilize the weight. Plus, Smith machines have safety mechanisms—either twistable bars that slide into catch hooks or adjustable safety stops—that prevent the bar from crashing down on you . This makes it far safer for lifters who don’t have a spotter.
It’s Accessible Everywhere
From big box gyms to hotel fitness centers to cruise ship gyms, Smith machines are everywhere . If you travel for work or find yourself in unfamiliar facilities, having the Smith machine shoulder press in your toolkit means you can always get a quality workout.
It Allows Heavier Loading
Because the machine provides stability, you can often lift slightly heavier than you could with free weights. A 2013 study found that the seated Smith machine overhead press allows you to be about 10% stronger compared to standing, making it easier to progressively overload your muscles .
Smith Machine vs. Free Weights: Which Is Better?
This is the million-dollar question. The answer, as with most things in fitness, is: it depends.
If your goal is pure hypertrophy (muscle growth): The Smith machine may have a slight edge. The 2020 study mentioned earlier suggested that the Smith machine shoulder press may create better muscle activation in the primary motor muscles because it promotes greater stability during exercise execution . When your stabilizers don’t have to work as hard, your target muscles can work harder.
If your goal is functional strength and athletic performance: Free weights might be better. They demand more shoulder stability and core strength, which carries over to real-world movements and other lifts .
If you’re concerned about injury: The Smith machine is generally safer. There’s less risk of the weight falling on you, and the fixed path reduces the chance of form breakdown . Jennifer Dorie specifically cites this stability as a key reason she prefers the Smith machine for overhead pressing .
The bottom line: You don’t have to choose. Many pros use the Smith machine for heavy compound work and then switch to dumbbells or cables for isolation exercises .
Variations and Modifications
If you want to keep your workouts fresh, try these variations.
Seated Smith Machine Shoulder Press – The standard version we’ve been discussing. Great for targeting the anterior delts with maximum stability .
Standing Smith Machine Shoulder Press – If your Smith machine is tall enough, try standing. This engages your core more and mimics the demands of a barbell overhead press.
Reverse-Grip Smith Machine Press – Using an underhand grip shifts some tension to your upper chest and triceps while still working your front delts.
Incline Bench Press in the Smith Machine – Setting the bench to a 45-degree angle turns this into an upper chest exercise, though it still hits the front delts .
How to Program the Smith Machine Shoulder Press
So how often should you do this exercise, and with what weight?
For most intermediate lifters: Perform Smith machine shoulder presses once or twice per week as part of your push day or shoulder-focused workout.
For hypertrophy: Aim for 3-4 sets of 8-12 reps. This rep range is ideal for muscle growth .
For strength: Try 4-5 sets of 5-8 reps with heavier weight.
Progressive overload is key. Whether you’re increasing weight, adding reps, or slowing down your tempo, you need to gradually challenge your muscles to keep growing .
Jennifer Dorie’s shoulder workout includes 4 sets of 15 reps on the Smith machine shoulder press, which is higher volume than typical but works for her physique goals .
A Word on Safety
No exercise is inherently dangerous. Injuries typically occur when you put more tension on your tissues than they can tolerate, either in a single session or over several weeks .
If you’ve only ever done shoulder pressing in the Smith machine, don’t expect to match that weight on a barbell press, which demands more stability. And if you’re transitioning from free weights to the Smith machine, start lighter than you think you need to .
Always prioritize form over weight. Your shoulders will thank you.
Tools to Support Your Fitness Journey
If you’re tracking your workouts and want to understand your body’s needs better, sometimes a little data helps.
👉 Use Our Free Fitness Unit Converter
If you’re following workout plans from different countries—US pounds, UK stones, Canadian kilograms—this tool instantly converts weight, height, distance, and pace. No more mental math when loading the bar.
👉 Use Our Free Calorie Calculator
This simple tool uses the scientific Mifflin-St Jeor equation to estimate your Basal Metabolic Rate (BMR) and Total Daily Energy Expenditure (TDEE). It can help you understand approximately how many calories you need to fuel those shoulder workouts.
👉 Use Our Free Weight Loss & Fitness Calculator
This gives you a fuller picture—BMI, BMR, TDEE, daily target, and estimated timeline to your goal. A helpful way to check in with where you are.
This article contains affiliate links. If you purchase through these links, I may earn a commission at no extra cost to you. I only recommend products I genuinely believe in.
A Final Thought
The Smith machine shoulder press is not a “cheat.” It’s not just for beginners. It’s a legitimate tool that can help you build stronger, safer, more impressive shoulders.
Dorian Yates used it to build an Olympia-winning physique. Jennifer Dorie uses it to maintain her champion shoulders. And you can use it too.
The key is proper form. Set up correctly. Keep your elbows at the right angle. Lower the bar with control. Don’t let your ego choose the weight.
Your shoulders will grow. And more importantly, they’ll stay healthy enough to keep growing for years to come.
Now go press.