Build a powerful back with the Bent Over Row. Learn correct form, 7 expert tips, common mistakes, and how to target your lats and traps for maximum growth.
If you want that V-taper physique that turns heads from London to Los Angeles, the Bent Over Row is non-negotiable. It is the king of compound back exercises, responsible for building the thickness, detail, and raw power that defines a strong physique.
Unlike machines that lock you into a fixed path, the barbell bent over row challenges your entire posterior chain. It builds grip strength, spinal erectors, lats, and traps all in one movement. However, it is also one of the most butchered exercises in the gym.
This guide will teach you exactly how to master the bent over row, avoid back pain, and pack on serious muscle.
💪 Bent Over Row: 7 Pro Tips for a Stronger, Thicker Back
Want a wide, thick back that turns heads? The bent over row is your answer. These 7 pro tips will transform your technique—building more muscle while protecting your lower back.
📖 Table of Contents
⚡ Quick Summary – 7 Pro Tips
- 1. Hinge at hips – keep back straight, not rounded
- 2. Pull bar to lower belly (not upper chest)
- 3. Squeeze shoulder blades together at the top
- 4. Control the negative (2-3 seconds down)
- 5. Use neutral grip for better lat engagement
- 6. Keep head neutral – look at floor
- 7. No momentum – strict form builds more muscle
Why the Bent Over Row?
The bent over row is one of the most effective back-building exercises you can do. It targets your lats, rhomboids, traps, and rear delts—building thickness and width that translates to real-world pulling strength.
Muscles Worked: What Gets Built?
How to Perform the Bent Over Row (Step-by-Step)
- Setup: Stand with feet shoulder-width apart, knees slightly bent. Hold the barbell with an overhand grip slightly wider than shoulder-width.
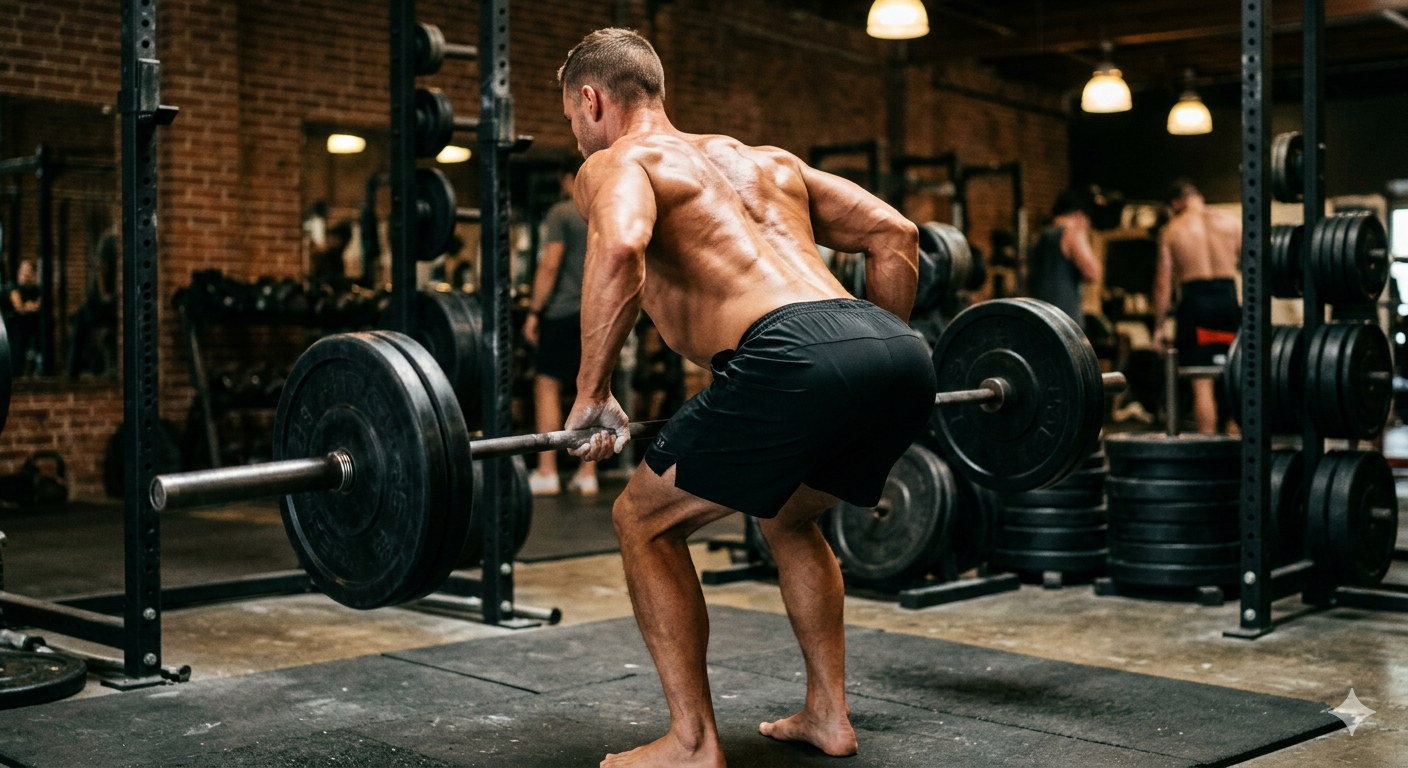
- Hinge: Push your hips back and lean your torso forward until it’s nearly parallel to the floor (about 45-90 degrees). Keep your back flat—never rounded.
- Start position: Let the barbell hang at arm’s length. Your shoulders should be slightly in front of the bar.
- Pull: Drive your elbows back and pull the bar toward your lower belly. Squeeze your shoulder blades together at the top.
- Lower: Control the bar back to the start position, feeling a stretch in your lats.
- Repeat: Perform 8-12 reps with strict form.
Tip 1: Hinge at the Hips, Not the Waist
1 Hinge at Hips – Keep Back Straight
Why it works: Bending at the waist rounds your lower back, putting dangerous stress on your spinal discs. Hinging at the hips (pushing your butt back) keeps your spine neutral and safe.
How to implement: Imagine someone is pulling a string attached to your tailbone straight back. Your torso should be nearly parallel to the floor, back flat, chest proud.
Tip 2: Pull to Your Lower Belly
2 Pull Bar to Lower Belly (Not Upper Chest)
Why it works: Pulling to your chest shifts tension to your upper traps and rear delts. Pulling to your lower belly targets your lats—the large wing muscles that create back width.
How to implement: Drive your elbows straight back, keeping them close to your body. The bar should touch somewhere between your belly button and lower ribs.
Tip 3: Squeeze Your Shoulder Blades
3 Squeeze Shoulder Blades Together at the Top
Why it works: The row is a back exercise, not an arm exercise. Squeezing your shoulder blades ensures your back muscles—not just your biceps—are doing the work.
How to implement: At the top of each rep, pause for 1 second and actively squeeze your shoulder blades together. Imagine holding a pencil between them.
Tip 4: Control the Negative
4 Control the Descent (2-3 Seconds Down)
Why it works: The eccentric (lowering) phase is where muscle damage and growth happen. Dropping the weight robs you of gains and increases injury risk.
How to implement: Take 2-3 seconds to lower the bar back to the start position. Feel the stretch in your lats before the next rep.
Tip 5: Use a Neutral Grip
5 Neutral Grip (Palms Facing Each Other) for Better Lat Engagement
Why it works: A neutral grip allows your elbows to track closer to your body, which puts your lats in a stronger mechanical position. It’s also easier on your wrists and elbows.
How to implement: Use a V-bar attachment on a cable row, or dumbbells with palms facing each other. If using a barbell, try a reverse grip (palms up).
Tip 6: Keep Your Head Neutral
6 Look at the Floor – Keep Neck Neutral
Why it works: Looking up or craning your neck strains your cervical spine and can cause headaches or neck pain. A neutral neck keeps your entire spine aligned.
How to implement: Pick a spot on the floor about 3-4 feet in front of you. Keep your gaze there throughout the entire set.
Tip 7: Don’t Use Momentum
7 Strict Form > Heavy Weight
Why it works: Jerking the weight uses momentum, not muscle. It’s a common ego lift that leads to injury and poor development. Strict form with lighter weight builds more muscle.
How to implement: If you can’t complete a rep without swinging your torso, the weight is too heavy. Drop the weight until you can row with zero momentum.
Barbell vs. Dumbbell vs. T-Bar Row: Which Is Best?
| Exercise | Best For | Pros | Cons |
|---|---|---|---|
| Barbell Row | Overall back thickness | Heavy weight, bilateral strength | Lower back stress |
| Dumbbell Row | Unilateral strength | Fix imbalances, longer range of motion | Less stable |
| T-Bar Row | Mid-back thickness | Great for rhomboids & traps | Requires specialized equipment |
❓ Frequently Asked Questions
This article contains affiliate links. I may earn a commission at no extra cost to you. Always consult a qualified trainer before beginning a new exercise routine.
What is the Bent Over Row?
The bent over row is a compound weight training exercise where you pull a barbell (or dumbbells) from an extended arm position toward your lower chest or upper abdomen while your torso is bent forward at the hips.
It is a fundamental “pull” movement that complements the bench press and squat. While often called a “back exercise,” it actually recruits multiple muscle groups to stabilize the body and move the weight.
Muscles Worked: What Are You Actually Building?
Understanding the muscle involvement helps you perform the exercise with better mind-muscle connection.
- Latissimus Dorsi (Lats): These are the large wing muscles on the sides of your back. They are primarily responsible for pulling the elbows down and back.
- Rhomboids and Trapezius (Traps): Located in the upper and middle back, these muscles are responsible for retracting the shoulder blades at the top of the movement.
- Posterior Deltoids (Rear Shoulders): The back of your shoulders assist in the pulling motion and contribute to that full, rounded look.
- Erector Spinae (Lower Back): These muscles work isometrically to keep your torso stable and at the correct angle throughout the set.
- Biceps and Forearms: As with any pulling exercise, your arms flex to help lift the bar, making this a great mass builder for the arms as well.
7 Pro Tips for a Stronger, Safer Row
To transform your back and stay injury-free, implement these seven expert tips.
1. Master the Hip Hinge
The setup determines the success of the row. Stand with your feet shoulder-width apart, knees slightly bent. Hinge at your hips—not your waist—by pushing your butt back. Your torso should be at roughly a 45-degree angle to the floor. A neutral spine (not rounded) is critical.
2. Grip Width Matters
Your grip width changes where the tension goes:
- Wide Grip: Emphasizes the upper back (traps and rhomboids).
- Shoulder-Width Grip: A balanced approach that hits the lats and middle back effectively.
- Underhand Grip (Reverse Grip): Increases biceps involvement and can hit the lower lats harder.
3. Pull to the Right Spot
Don’t just yank the bar anywhere. Aim to pull the bar toward your lower chest or upper stomach. Imagine driving your elbows past your torso, squeezing your shoulder blades together at the top.
4. Control the Negative (Eccentric)
The biggest mistake lifters make is dropping the weight. The lowering phase is where muscle fibers tear and rebuild. Lower the bar in a controlled manner over 2-3 seconds, feeling a stretch in your lats at the bottom.
5. Keep Your Head Neutral
Looking up into a mirror is a common error that strains the neck. Keep your head in line with your spine. Pick a spot on the floor a few feet in front of you and focus on that.
6. Don’t Use Momentum
If you are jerking your torso to get the weight up, the weight is too heavy. The movement should be strict. The only things that should move are your arms. Your torso stays locked in place.
7. Squeeze at the Top
Pause for a full second at the top of each rep. This eliminates momentum and ensures your back muscles—not momentum—are doing the work.
Common Mistakes That Kill Back Gains
Even experienced lifters fall into these traps. Avoid them to maximize growth.
- Rounding the Back: This is the #1 safety hazard. A rounded spine under load is a recipe for a herniated disc. Keep your chest up and core braced.
- Using the Legs: If you need to straighten your legs to lift the bar, you are doing a deadlift-row hybrid. Drop the weight and reset.
- Partial Reps: Cutting the range of motion by not lowering the bar fully or not pulling it high enough robs your muscles of growth stimulus. Use a full range of motion.
- Ego Lifting: Trying to impress others with huge plates usually results in terrible form. The bodybuilders with the best backs usually use weights that allow perfect control.
Bent Over Row Variations
To keep your back guessing and growing, rotate these variations into your routine.
| Variation | Best For | Key Difference |
|---|---|---|
| Pendlay Row | Power and explosive strength | Bar starts from dead stop on floor each rep; torso parallel to ground. |
| Yates Row | Lower lat and overall mass | Underhand grip; torso more upright (approx. 60 degrees); pull to stomach. |
| Dumbbell Row | Fixing imbalances and range of motion | One arm at a time; allows for a greater stretch and peak contraction. |
| T-Bar Row | Stability and heavy loading | Chest supported or freestanding; great for targeting the middle back. |
Programming the Bent Over Row
How often should you do this exercise?
For most intermediate lifters, performing bent over rows once or twice per week is sufficient. Aim for 3-4 sets of 8-12 reps for hypertrophy. If you are focusing on strength, heavier sets of 5-8 reps work well.
Always perform this exercise early in your back workout, after any deadlifts, when your central nervous system is fresh.
Optimize Your Physique: Track Your Progress
Building a stronger back with the Bent Over Row is a powerful goal, but to truly see definition and measure your body transformation, you need to align your training with the right nutrition.
Understanding your daily caloric needs ensures you’re either fueling for muscle growth or creating the right deficit to reveal the muscle definition you’re building.
👉 Use Our Free Weight Loss & Fitness Calculator
This smart tool uses the scientific Mifflin-St Jeor equation to calculate your Basal Metabolic Rate (BMR) and Total Daily Energy Expenditure (TDEE). It provides a personalized daily calorie target and estimates your timeline to your goal. Don’t leave your results to chance—track your progress and fuel those back workouts effectively.
Conclusion
The Bent Over Row is the cornerstone of any serious back-building program. By mastering your form, implementing the seven pro tips outlined above, and avoiding common mistakes, you can build a thicker, wider, and stronger back safely and effectively.
Remember to control the weight, squeeze at the top, and progressively overload over time. Your future self—with that powerful V-taper—will thank
🧠 The Smart Lifter’s Toolkit: Track, Fuel, and Recover
Building a thicker back isn’t just about lifting heavy. It’s about tracking your progress, fueling your muscles, and giving your body the recovery it needs. Here’s how our free tools help you do all three:
- 📊 Track Everything in One Place – Log your bent over row weights, sets, and reps alongside your sleep, steps, and calories burned. See your progress over time.
- 🥗 Fuel Your Muscle Growth – Bent over rows demand energy. Use our meal planner to build a high-protein diet that supports back development without the guesswork.
- ⚖️ Find Your Calorie Sweet Spot – Eating too little kills your gains. Eating too much adds unwanted fat. Our calculator finds the balance for your specific goal.
- 💧 Support Recovery with a Daily Detox – Intense back training creates metabolic waste. Gentle daily detox habits support your body’s natural cleaning processes.
- 📉 Reveal Your Progress – If you’re cutting, the weight loss calculator shows exactly how long it will take to reveal the muscle you’re building underneath.
- 📅 Stay Organized – Consistency is king. Use a dedicated planner to schedule your bent over row days and track every variable.
- 👉 Get the Male Daily Planner (Note: Update this link to your actual Male Planner page if different)