Yoga doesn’t have to be intense or complicated. Gentle yoga is a simple and calming way to relax your mind, release stress, and slowly improve flexibility—no matter your age or fitness level.
Why Gentle Yoga Is Perfect for Beginners
Gentle yoga focuses on slow movements, deep breathing, and body awareness. It helps reduce tension, improves posture, and makes your body feel lighter and more relaxed. You don’t need experience, special equipment, or a lot of time—just a quiet space and a few minutes.
How to Prepare for Gentle Yoga
Before you start, wear comfortable clothes and choose a peaceful place. Use a yoga mat or a soft surface. Move slowly, breathe deeply, and never force your body into a position. Yoga should feel good, not painful.
7 Gentle Yoga Routines to Reduce Stress and Boost Flexibility Naturally
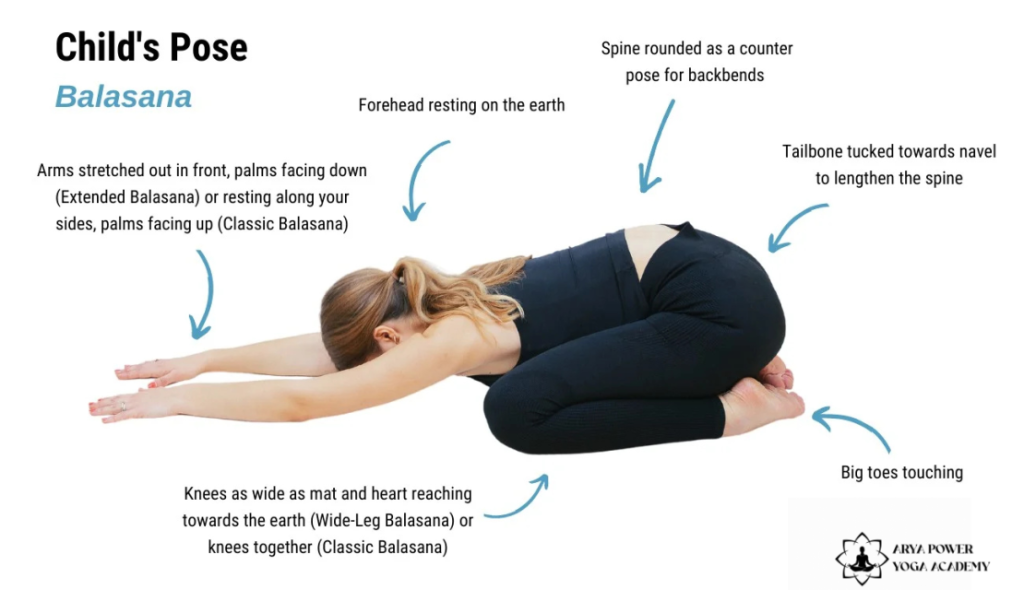
Child’s Pose (Balasana) for Deep Relaxation
This calming pose relaxes the back, shoulders, and neck. It helps quiet the mind and release emotional stress.
How to Do Child’s Pose Correctly
Child’s Pose is a resting posture, but small misalignments can cause discomfort. Follow these steps for proper form:
Step-by-Step Instructions:
- Start on hands and knees: Kneel on a mat with your knees hip-width apart and your big toes touching behind you.
- Lower your hips: Sit your hips back toward your heels. If your hips don’t reach your heels, place a folded blanket or block between your thighs and calves.
- Fold forward: Hinge at your hips and walk your hands forward, bringing your torso down to rest on or between your thighs.
- Position your arms (two options):
- Active stretch: Extend arms straight forward, palms down, fingertips reaching away.
- Passive rest: Place arms alongside your thighs, palms up, letting your shoulders round forward.
- Rest your forehead: Gently place your forehead on the mat. If it doesn’t touch, place a yoga block or a fist under your forehead.
- Relax fully: Close your eyes. Let your belly expand with each inhale and fully relax with each exhale. Hold for 5–15 breaths.
Common mistakes to avoid:
- Knees too wide or too narrow: Knees wider than hips can strain the groin; knees together restricts the belly. Hip-width is ideal.
- Lifting the hips away from the heels: This turns the pose into a forward fold, losing the lower back release. Let your hips sink heavy.
- Shrugging the shoulders: Keep shoulders relaxed away from the ears, especially when arms are extended forward.
2. Stress-Relief Benefits of Balasana
Balasana is a mild inversion (heart above the head) and forward fold, which naturally calms the nervous system. Key stress-relief benefits include:
- Activates the parasympathetic nervous system: The gentle pressure on the forehead and the forward bending stimulate the vagus nerve, shifting you out of “fight-or-flight” (sympathetic) into “rest-and-digest” mode. This lowers cortisol and heart rate.
- Releases physical tension in the back and shoulders: Stress often accumulates as tightness in the lower back, neck, and trapezius muscles. Child’s Pose gently stretches these areas without effort.
- Encourages deep, diaphragmatic breathing: The slight compression on the chest and belly creates natural resistance, making exhales longer and more grounding. Long exhales are proven to reduce anxiety.
- Provides a sensory “retreat”: Closing the eyes and placing the forehead on the floor blocks out visual and environmental stimuli, creating a safe, inward-focused space. This is why it’s often used as a reset between challenging poses or during overwhelming moments.
- Reduces fatigue and headaches: By calming the brain and relieving tension in the neck and scalp, Balasana can alleviate stress-induced tension headaches and mild dizziness.
3. Beginner Tips for Maximum Comfort
Since tight hips, knees, or a belly can make Child’s Pose uncomfortable, use these modifications to find ease:
| Discomfort | Solution |
|---|---|
| Hips don’t reach heels | Place a folded blanket or bolster between your back thighs and calves. Rest your hips on it. |
| Forehead doesn’t touch floor | Make two fists and stack them, or use a yoga block under your forehead. Alternatively, rest forehead on a folded towel. |
| Knee or ankle pain | Roll a small towel and place it behind your knees (if hyperextending) or under your ankles. Keep knees wider than hips to reduce knee torsion. |
| Difficulty breathing or belly compression | Spread your knees as wide as the mat, allowing your torso to sink between the thighs rather than onto them. Keep your chest lifted slightly. |
| Neck tension when arms are extended | Walk your hands to one side (e.g., left side for 5 breaths, then right). Or simply tuck arms alongside your thighs (palms up). |
| Pregnancy (second/third trimester) | Avoid compressing the belly. Instead, take a wide-knee Child’s Pose with knees mat-width apart, chest hovering above the floor, and forehead on stacked fists or a block. |
Pro tip for beginners: Always enter and exit slowly. On an exhale, walk your hands back to sit up, allowing your head to come up last (prevents dizziness). Use Child’s Pose whenever you feel breathless, shaky, or overwhelmed during practice — it’s never “giving up,” but a tool for self-regulation.
Cat-Cow Stretch (Marjaryasana-Bitilasana) to Release Tension
A gentle movement that stretches the spine and improves flexibility while easing tension in the back.
Cat-Cow Stretch (Marjaryasana-Bitilasana) to Release Tension
Step-by-Step Cat-Cow Flow
This gentle, flowing sequence links two poses with the breath. Move slowly and deliberately.
Starting position: Come to hands and knees (tabletop position).
- Wrists directly under shoulders, fingers spread wide.
- Knees directly under hips, hip-width apart.
- Spine neutral (like a flat tabletop), gaze at the floor.
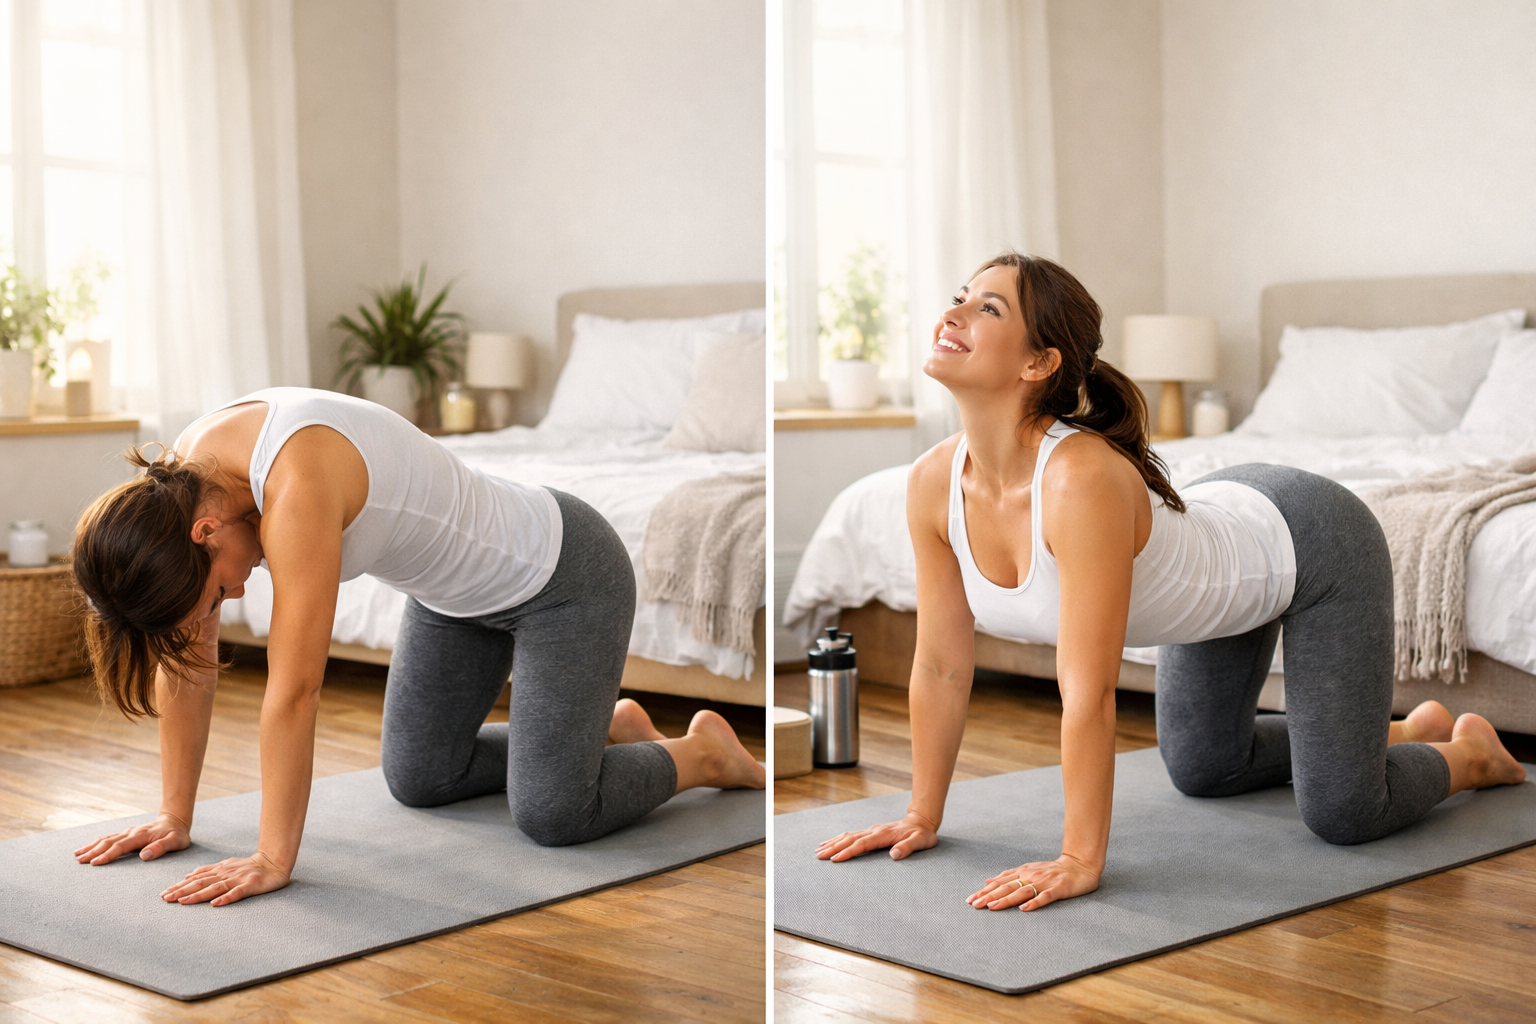
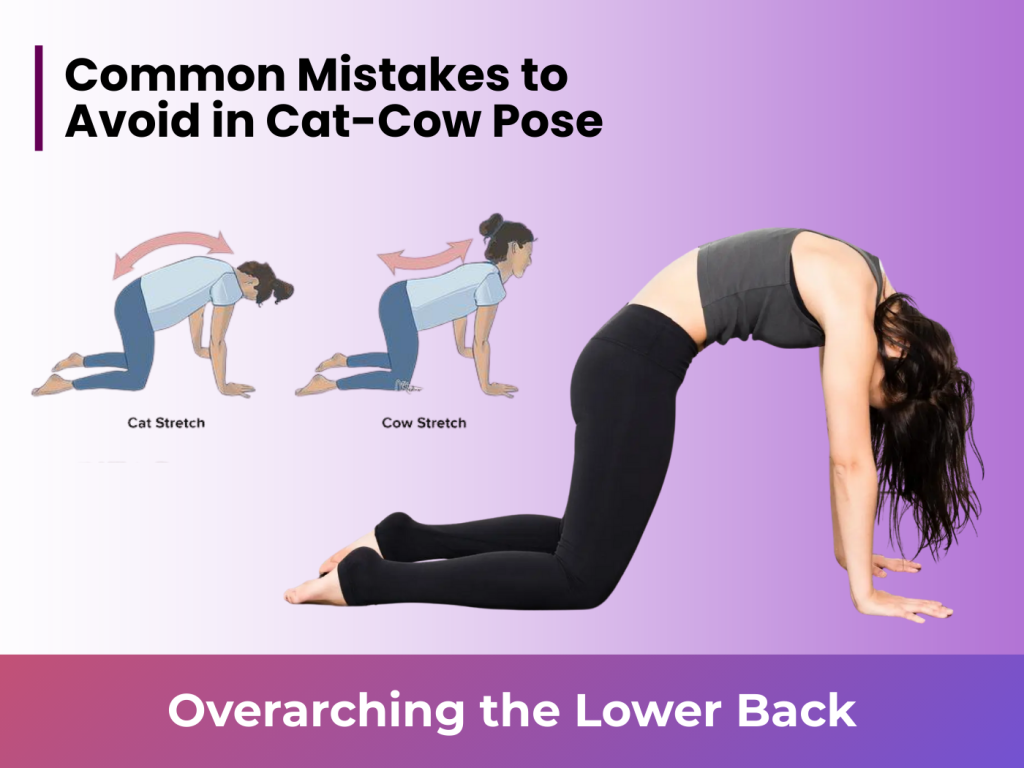
Step 1 — Cow Pose (Bitilasana) — Inhale:
- On an inhalation, drop your belly toward the mat.
- Lift your sitting bones and chest toward the ceiling.
- Draw your shoulder blades together and down your back.
- Gaze gently forward or slightly up (without cranking your neck).
- Feel: A gentle front-body stretch through belly, chest, and throat.
Step 2 — Cat Pose (Marjaryasana) — Exhale:
- On an exhalation, reverse the movement.
- Draw your belly button up toward your spine (rounding the back like a Halloween cat).
- Tuck your tailbone under (press pubic bone forward slightly).
- Let your head release toward your chest — gaze at your navel.
- Press firmly through your hands and knees.
- Feel: A releasing stretch through your back body — shoulders, mid-back, and sacrum.
Step 3 — Flow:
- Repeat 5–10 times, moving slowly with each inhale (Cow) and exhale (Cat).
- Imagine your spine becoming a wave: Cow = dip, Cat = arch.
How It Improves Spine Flexibility
Cat-Cow is one of the most effective spine-mobilizing exercises because it addresses all major spinal movements:
| Spinal Action | Cat-Cow Benefit |
|---|---|
| Flexion (rounding) | Cat pose stretches the erector spinae (back muscles), rhomboids, and glutes. It releases chronic lower-back tightness. |
| Extension (arching) | Cow pose strengthens spinal extensors and stretches the chest, abdominals, and hip flexors — undoing “hunchback” posture. |
| Intervertebral movement | The rhythmic motion pumps synovial fluid into the spinal discs, improving lubrication and reducing stiffness (great for desk workers). |
| Facet joint health | Gentle compression/decompression of tiny facet joints between vertebrae keeps them mobile and pain-free. |
| Whole-spine coordination | Unlike isolated stretches, Cat-Cow coordinates the neck, upper back, lower back, and pelvis together, improving inter-regional control. |
Progression: Once comfortable, slow down the breath (e.g., 8-second inhale for Cow, 8-second exhale for Cat) to deepen intervertebral movement.
Breathing Techniques for Better Results
Without proper breath, Cat-Cow becomes just mechanical bending. Use these guidelines:
| Phase | Breath | Action | Ratio (Optional) |
|---|---|---|---|
| Cow (arch) | Inhale | Expand belly, lift chest, open front body | Inhale for 4–6 seconds |
| Cat (round) | Exhale | Draw navel to spine, contract abdominals, lengthen back | Exhale for 4–8 seconds |
Advanced breath technique: Pranayama integration
- Longer exhale in Cat: Make your exhale 2x longer than your inhale (e.g., inhale 3 sec, exhale 6 sec). This stimulates the vagus nerve and deepens the spinal flexion stretch.
- Breath-sound connection: Add a soft “haaaa” sound during Cat’s exhale to release jaw tension and lengthen the exhale further.
- Pause at the bottom: After Cat (full exhale), pause for 1–2 seconds with belly drawn in. After Cow (full inhale), pause briefly before exhaling. This builds interoception (body awareness).
Common mistake: Holding your breath or moving too fast. Let your breath lead — the spine follows.
Seated Forward Fold (Paschimottanasana) for Calmness
Proper Form and Alignment Tips
Seated Forward Fold stretches the entire back body (Paschimottanasana = “west side stretch” — the back body). Done correctly, it is deeply grounding.
Step-by-step:
- Sit on the mat: Extend both legs straight in front of you. Flex your feet (toes pointing toward the ceiling).
- Elevate your hips (crucial!): Sit on a folded blanket or block so your hips are higher than your knees. This tilts your pelvis forward naturally.
- Lengthen upward: Inhale — reach both arms overhead, lengthen your spine as tall as possible.
- Hinge, don’t round: Exhale — lead with your chest, hinging forward from your hip joints (like a door closing). Keep your back flat as long as possible.
- Find your edge: Once your spine begins to round, stop. Hold there. You don’t need to touch your toes.
- Final position (options):
- Hands on shins: Most common for beginners.
- Hold your feet: If flexible, hold your big toes with peace fingers (index + middle finger).
- Hands on floor: If very flexible, rest palms beside your thighs.
- Relax: Let your head hang heavy. With each exhale, soften a little deeper — but never force.
- Stay for 8–12 breaths. To come up: Inhale — press hands into floor or shins, lift chest first, then head last.
Alignment checklist:
- Knees point straight up (not rolled inward/outward)
- Feet flexed (protects hamstring attachments)
- Shoulders relaxed away from ears
- Neck long (not collapsed)
- Never round your lower back aggressively — this strains lumbar discs
How This Pose Reduces Anxiety
Paschimottanasana is a recommended pose in yoga therapy for generalized anxiety and panic disorders. Here’s why:
| Mechanism | Effect on Anxiety |
|---|---|
| Forward fold compression | Gentle pressure on the abdomen massages internal organs, stimulating the parasympathetic nervous system (rest-and-digest). |
| Lengthened hamstrings | Chronically tight hamstrings (common in fight-or-flight states) signal stress to the brain. Releasing them lowers baseline tension. |
| Inversion + forehead proximity | Your head drops below your heart, a mild inversion that calms the amygdala (fear center) and lowers blood pressure. |
| Slowed heart rate | Forward folds naturally trigger the baroreflex — sensors in neck vessels that reduce heart rate when head is lowered. |
| Withdrawal from external stimuli | Eyes closed, head down, arms wrapped around legs — a fetal-like position of safety. This reduces sensory overload. |
| Long, controlled exhales | The pose encourages extended exhalations (breathing into your back body), which directly counteracts hyperventilation and rapid breathing of anxiety. |
Clinical note: Studies have shown that regular Paschimottanasana practice (10 minutes daily) can reduce salivary cortisol levels by up to 25–30% in chronic stress patients, comparable to some meditation protocols.
Modifications for Beginners
If you have tight hamstrings, lower back issues, or find this pose uncomfortable, use these modifications:
| Challenge | Modification |
|---|---|
| Lower back rounds sharply | Sit on a higher prop (2–3 folded blankets or a yoga bolster). Bend your knees slightly — place a rolled blanket under them if needed. |
| Hamstrings feel like they’ll tear | Use a yoga strap around the balls of your feet. Hold the strap with both hands, and walk your hands down the strap as you fold. Keep knees bent generously. |
| Can’t reach legs at all | Skip the forward fold entirely. Instead, sit against a wall with legs extended, and simply rest your hands on your thighs. Focus on lengthening your spine and breathing. |
| Neck pain from hanging head | Place a block or folded towel under your forehead so your head is fully supported. Or keep your head upright (gaze forward) — you’re still getting the hamstring stretch. |
| High blood pressure / glaucoma | Avoid full head-below-heart forward folds. Modify: Do the pose lying on your back (Supta Paschimottanasana) — one leg extended, the other pulled toward chest with a strap. |
| Pregnancy (any trimester) | Do Wide-Legged Seated Forward Fold (Upavistha Konasana) instead — legs open wide, fold forward between them, leaving space for belly. Or skip and use Child’s Pose. |
Beginner’s reminder: You do not need to touch your toes or get your face to your shins. A 10-degree forward hinge with a straight spine and hands on knees is still “Seated Forward Fold.” Progress comes from consistency, not force.
This pose gently stretches the lower back and legs while encouraging deep, relaxing breaths.
4. Legs-Up-the-Wall Pose (Viparita Karani) for Instant Stress Relief
Easy Setup at Home
This pose requires almost no equipment and can be done anywhere with a clear wall space.
What you need:
- A bare wall (next to a bed, couch, or empty floor space)
- Optional: A folded blanket or thin cushion for your head/neck
- Optional: An eye pillow or a rolled-up towel to cover your eyes
Step-by-step setup:
- Position your mat: Place your yoga mat or a carpet runner perpendicular to the wall, with the short edge touching the baseboard.
- Sit sideways: Sit on the mat with your left hip touching the wall, knees bent, feet on the floor.
- Swing legs up: Gently swing your legs up the wall as you lower your torso onto the mat. Your sitting bones should be close to the wall (2–4 inches away — not pressed flat against it).
- Adjust distance: If your hamstrings feel tight, scoot your hips slightly farther from the wall. If your lower back arches uncomfortably, move hips closer.
- Lie flat: Rest your head, neck, and spine on the mat. Arms rest at your sides, palms up, shoulder blades relaxed.
- Final check: Your legs should be vertical against the wall, thighs together, feet relaxed (toes pointing toward the ceiling or slightly apart).
Pro tip for home: Use the side of your bed or a couch if you can’t get on the floor. Lie perpendicular to the bed with your calves resting on the mattress (knees at the edge). Same benefits, less floor work.
Benefits for Nervous System Relaxation
Viparita Karani is often called the “great rejuvenator” because of its profound effect on the autonomic nervous system.
| System / Mechanism | Specific Benefit |
|---|---|
| Venous return (circulation) | Gravity assists deoxygenated blood and lymphatic fluid from the legs back to the heart. This reduces leg swelling (edema) and improves immune cell circulation — without straining the heart. |
| Baroreceptor activation | When legs are elevated, pressure sensors in the carotid arteries (neck) detect increased blood flow to the upper body. They signal the brain to lower systemic blood pressure and heart rate. |
| Parasympathetic dominance | The inverted but supported position shifts the nervous system away from sympathetic (stress/fight-or-flight) toward parasympathetic (rest-and-digest). This lowers cortisol within 5–10 minutes. |
| Reduced sympathetic tone | Chronically tight calf muscles and plantar fascia (from standing/sitting) send stress signals upward. Elevating and relaxing the legs interrupts this feedback loop. |
| Vagus nerve stimulation | The gentle pressure of the thighs against the lower abdomen (when legs are vertical) stimulates the vagus nerve, which runs from brain to gut, promoting calm and digestive function. |
| Cerebral blood flow regulation | Mild inversion increases blood flow to the brain’s posterior circulation (occipital lobe, cerebellum), which can relieve tension headaches and improve mental clarity without the risk of full inversions (headstand). |
Who benefits most: People who stand all day (nurses, retail workers), frequent flyers (reduces leg swelling), those with insomnia or racing thoughts, and anyone recovering from moderate exercise.
Contraindications: Glaucoma, uncontrolled high blood pressure (consult doctor), active hernia, late-term pregnancy (modify: keep legs lower — on a chair instead of wall), or serious neck/back injuries.
How Long to Hold for Best Results
Unlike active poses, longer is generally better with Viparita Karani — but timing matters.
| Duration | Effect |
|---|---|
| 1–3 minutes | Leg swelling temporarily reduced; mild relaxation begins |
| 5–8 minutes | Heart rate measurably lowers; parasympathetic system activates; cortisol begins dropping |
| 10–12 minutes | Optimal stress relief window — blood pressure stabilizes, anxiety symptoms (racing heart, shallow breath) noticeably subside |
| 15–20 minutes | Deep nervous system reset; can induce meditative or drowsy state (excellent before bed) |
| Over 20 minutes | Possible therapeutic benefit for chronic fatigue or severe anxiety, but legs may fall asleep; come out slowly |
Beginner protocol: Start with 5 minutes. Set a timer with a gentle alarm (not a startling noise). Increase by 2 minutes each session until you find your sweet spot — most people land between 8–12 minutes.
How to come out safely (very important):
- Bend your knees, place feet flat on the wall.
- Push feet into wall and slide your hips back a few inches.
- Roll gently onto your right side (keeps blood pressure steady).
- Stay on your side for 3–5 breaths.
- Use your arms to press up to sitting slowly. If dizzy, sit for another minute before standing.
5. Butterfly Pose (Baddha Konasana) to Open Hips Gently
Correct Posture and Technique
Butterfly Pose (also called Bound Angle or Cobbler’s Pose) is a seated hip opener. Correct alignment prevents knee strain.
Step-by-step:
- Start seated: Sit on the floor with legs extended straight in front of you.
- Elevate hips (critical!): Sit on a folded blanket or yoga block so your hips are higher than your knees. Without this, your pelvis tilts back, rounding your lower spine.
- Bring soles together: Bend your knees, dropping them out to the sides. Bring the soles of your feet to touch, heels close to your pelvis (as close as comfortable).
- Clasp your feet: Hold your feet or ankles with both hands. Keep the outer edges of your feet pressed together (not just the toes).
- Lengthen spine: Inhale — sit tall, lifting through the crown of your head. Roll your shoulders back and down.
- Knees: Allow your knees to relax toward the floor. Do NOT push them down with hands or force.
- Optional forward fold: Exhale — hinge forward from the hips (keeping a long spine) until you feel a comfortable stretch. Rest your forehead on a block or the floor if possible.
- Hold: Stay for 8–15 breaths. To release, inhale — lift your chest, use hands to lift knees back together slowly.
Alignment checklist:
- Feet actively pressed together (outer edges touching)
- Spine long — no slouching
- Shoulders stacked over hips (not leaning back)
- Knees at a comfortable height (not flopping or high tension)
- Never bounce your knees — it strains the inner thigh muscles (adductors) and hip cartilage
Flexibility Benefits for Hips and Inner Thighs
Baddha Konasana is a multidirectional hip opener that targets several tight areas simultaneously.
| Muscle/Tissue | How Butterfly Pose Stretches It |
|---|---|
| Adductors (inner thigh muscles) | With knees out and heels close, the adductor magnus, longus, and brevis are placed in a lengthened position — especially the gracilis (the long superficial inner thigh muscle). |
| External hip rotators | Piriformis, gemelli, and obturators (deep lateral hip muscles) are gently stretched, improving hip external rotation range. |
| Psoas (iliopsoas) | When you fold forward with soles together, the psoas (hip flexor) releases from its often-shortened state — beneficial for runners and desk workers. |
| Groin and pelvic floor | The opening of the thighs gently stretches the adductor brevis and pectineus (groin) and encourages pelvic floor relaxation. |
| Knee joint mobility | Although not a knee stretch, regular practice improves the knee’s ability to tolerate external rotation, reducing stiffness from prolonged sitting. |
Functional benefits you’ll notice:
- Easier to sit cross-legged on the floor
- Reduced lower back pain (tight hips pull on the pelvis, straining the lower back)
- Improved squat depth (hip external rotation carries over)
- Less stiffness after long car rides or flights
Anatomy note: If your knees rise high (near shoulder level), that’s perfectly fine. “Opening the hips” does not mean knees on the floor — it means accessing your current range safely. Over time, gravity will lower the knees.
Gentle Variations for Beginners
Many people have tight hips or knee sensitivities. Use these modifications to find a comfortable version.
| Challenge | Variation |
|---|---|
| Knees pop or hurt | Place rolled towels or foam blocks under your knees for support. Or keep legs in a wide V shape (Upavistha Konasana) instead of feet together. |
| Lower back rounds / pelvis tucks | Sit on higher props — two blankets or a firm cushion (4–6 inches high). This tilts your pelvis forward naturally, protecting your lumbar spine. |
| Feet won’t stay together | Use a yoga strap around both feet (just above the arches). Hold the strap ends with your hands, then relax your knees down. This keeps feet aligned without effort. |
| Too much inner thigh stretch | Move your heels farther from your pelvis (feet forward by 4–6 inches). This reduces the intensity of the adductor stretch while keeping hips engaged. |
| Pregnancy (any trimester) | Do supine Butterfly — lie on your back with soles together, knees supported by pillows, and a rolled towel under your neck. Or sit against a wall for back support. |
| Knee injury / replacement | Skip Butterfly entirely. Do Reclining Hand-to-Big-Toe Pose (Supta Padangusthasana) with a strap — legs separated to the side instead of bent. |
| Extremely tight hips (men, seniors, runners) | Practice against a wall — sit with your back flat against a wall, soles together, knees resting on rolled blankets. The wall keeps your spine vertical, taking pressure off the hips. |
Beginner’s home practice:
- Do Butterfly Pose while watching TV or reading — hold for 2–3 minutes relaxed.
- Gently “flutter” your knees up and down (small, slow, 1-inch movements) for 30 seconds. This pumps synovial fluid into the hip joints and warms the adductors before holding static.
- Never force knees down. Imagine your thigh bones are heavy and melting downward with gravity alone.
A slow twist that improves spine flexibility and supports digestion.
Here are the final two poses in your series: Standing Forward Bend (Uttanasana) and Corpse Pose (Savasana). These provide a complete arc from active release to total rest.
6. Standing Forward Bend (Uttanasana) to Release Body Tension
Step-by-Step Instructions
Uttanasana is a standing forward fold that provides an intense stretch to the entire back body while calming the mind. Perform it slowly, especially if you have tight hamstrings or lower back issues.
Starting position: Standing at the front of your mat, feet hip-width apart (or slightly narrower), toes pointing forward. Knees are soft (micro-bent), not locked.
Step 1 — Prepare to fold:
- Place your hands on your hips.
- Inhale — lengthen your spine tall, reaching the crown of your head toward the ceiling.
Step 2 — Fold forward (exhale):
- Exhale — hinge forward from your hip joints (not your waist). Imagine your pelvis is a bowl tipping forward.
- Keep your spine as long as possible. Only go as far as your hamstrings allow before your back begins to round.
Step 3 — Find your hand position (three options):
| Option | Description | Best for |
|---|---|---|
| Hands on shins | Place palms on your shins, just below knees. Use arms to gently pull your torso toward thighs. | Beginners; tight hamstrings |
| Fingertips on floor | Softly touch the floor with fingertips. Keep knees bent generously. | Moderate flexibility |
| Palms flat on floor | Place palms flat beside feet or slightly in front. Knees can be straight or slightly bent. | Flexible hamstrings |
Step 4 — Let your head hang:
- Allow your head to release completely toward the floor, heavy and relaxed.
- If your neck feels strained, nod your head gently “yes” or shake “no” to release tension.
Step 5 — Hold and breathe:
- Stay for 5–10 breaths. With each exhale, soften a tiny bit deeper — never forcing or bouncing.
- To come up: Inhale — press hands into shins or floor, lift your chest to halfway (flat back), then slowly rise to standing on a full inhale, head coming up last.
Pro tip: If you feel dizzy on the way up, stay in a halfway lift (hands on shins, back flat) for 3 breaths before standing fully.
How It Relieves Stress and Fatigue
Uttanasana is unique among forward folds because gravity is actively working with you. This creates specific physiological benefits for stress and exhaustion.
| Mechanism | Effect on Stress & Fatigue |
|---|---|
| Inversion with minimal effort | Your head drops below your heart without straining muscles (unlike headstand). This increases blood flow to the brain, delivering oxygen and glucose — countering mental fatigue and brain fog. |
| Parasympathetic activation | The forward folding position compresses the abdomen, massaging internal organs and stimulating the vagus nerve. This shifts the nervous system away from the stress response. |
| Release of chronic tension patterns | Prolonged stress causes shortening of hamstrings, glutes, and spinal erectors (the “stress hunch”). Uttanasana lengthens these muscle groups, breaking the physical feedback loop of tension. |
| Sinus and headache relief | The mild inversion promotes drainage of sinus passages and reduces pressure in the head — effective for stress-induced tension headaches. |
| Blood pressure regulation | For those with elevated blood pressure from chronic stress, the pose triggers the baroreflex (neck pressure sensors), signaling the heart to slow down and vessels to dilate. |
| Adrenal gland modulation | The gentle abdominal compression is thought to influence the adrenal glands (which produce cortisol), potentially reducing their overactivity in chronic stress states. |
When to practice: Mid-afternoon energy slump (instead of caffeine), after prolonged standing or walking, or as a transition between active and restorative poses.
Safety Tips to Avoid Strain
Uttanasana is safe for most people, but improper form can strain your lower back, hamstrings, or knees.
| Safety Concern | How to Avoid |
|---|---|
| Lower back strain | Keep knees bent — even deeply bent. A rounded lower back with straight knees is the #1 cause of injury. Bend your knees until your chest touches your thighs, then slowly begin to straighten legs if desired. |
| Hamstring tear (especially near sit bone) | Never “bounce” or pulse in the pose. Move slowly. If you feel a sharp pain at the top of the hamstring (under the buttock), straighten your knees less or come out entirely. |
| Knee hyperextension | If your knees naturally lock backward (genu recurvatum), keep them consciously soft — a slight bend at all times. |
| Dizziness / lightheadedness | Come up very slowly — head last. If dizzy, immediately bend knees deeply or sit down. Avoid if you have very low blood pressure or are severely dehydrated. |
| Glaucoma or retinal issues | Avoid Uttanasana altogether (head-below-heart increases eye pressure). Instead, practice Ardha Uttanasana (half forward bend) with hands on a wall, keeping head level with heart. |
| Pregnancy (second/third trimester) | Do Wide-Legged Forward Fold (Prasarita Padottanasana) with hands on blocks or a chair back. Keep space for belly. Avoid deep compression. |
| Acute lower back injury (herniated disc) | Skip Uttanasana entirely. Forward flexion can worsen certain disc injuries. Consult a physical therapist. |
Emergency stop signals: Sharp pain (anywhere), numbness/tingling in legs or feet, sudden headache, or vision changes. Exit immediately if these occur.
7. Corpse Pose (Savasana) for Full-Body Relaxation
How to Practice Savasana Effectively
Savasana looks simple — lying flat on your back — but it’s widely considered the most difficult yoga pose because it asks you to do absolutely nothing. Here’s how to practice it effectively.
Traditional setup:
- Lie on your back: Extend your legs comfortably apart (about hip-width), feet flopping open to the sides.
- Arms: Rest arms alongside your body, palms facing up, fingers relaxed and curled naturally. Arms should be a few inches away from your body, not touching.
- Head and neck: Align your head in a neutral position — not tilted back or chin tucked. If your chin points upward, place a folded towel under your head.
- Shoulders: Slide your shoulder blades down toward your waist. Release any tension or lifting.
- Close your eyes: Gently. Relax your face completely — jaw slack, tongue off the roof of your mouth, eye muscles soft, forehead smooth.
- Body scan (essential for effectiveness): Mentally travel through your body three times:
- First pass (quick): Notice large areas — feet, legs, pelvis, chest, arms, head.
- Second pass (detailed): Intentional release — soften your toes, let knees fall outward, relax your belly, unclench your jaw, release your tongue, soften your eyes.
- Third pass (surrender): Feel your entire body sinking into the mat, as if gravity is increasing.
Common mistakes that reduce effectiveness:
- Legs or arms touching your body (creates a subtle holding pattern)
- Head tilted (strains neck muscles)
- Eyes partially open (keeps visual cortex active)
- Thinking about “doing it right” (the goal is to stop trying)
- Jumping up immediately at the end (defeats the nervous system reset)
What to do with your mind: You cannot “clear your mind” by force. Instead, focus your attention on one thing — your natural breath, the feeling of your heartbeat, or the weight of your body. When thoughts arise (they will), simply notice them without judgment and gently return to your anchor point.
How long: 5–15 minutes. Less than 3 minutes is too short for nervous system shift. More than 20 minutes may lead to grogginess unless you’re severely sleep-deprived.
Mental Health Benefits and Deep Relaxation
Savasana is not “taking a nap” — it’s an active practice of conscious relaxation. Research supports its benefits for multiple mental health conditions.
| Mental Health Area | How Savasana Helps |
|---|---|
| Generalized anxiety | Reduces baseline sympathetic nervous system activity. Regular practice lowers resting heart rate and skin conductance (a measure of physiological arousal). |
| Panic disorder | Teaches the skill of remaining still during uncomfortable bodily sensations (racing heart, tingling). This reduces fear-of-fear cycles. |
| Insomnia | Practicing Savasana before bed (or as a mid-day reset) improves sleep onset latency — the time it takes to fall asleep. It also reduces hyperarousal (racing thoughts at bedtime). |
| Depression with fatigue | Unlike naps which can worsen fatigue, Savasana with body scanning increases interoceptive awareness (sensing internal body states) — often blunted in depression. |
| PTSD / hypervigilance | The practice of lying still in a safe environment (with eyes closed and arms open) gradually reduces hypervigilance and startle response. |
| Chronic stress burnout | Lowers cortisol levels more effectively than passive rest (sitting in a chair). The horizontal position with supported limbs signals “safety” to the brainstem. |
| Emotional regulation | Improves the ability to tolerate uncomfortable emotions without reacting — skills learned in the body during Savasana transfer to daily life. |
Deep relaxation metrics: After 10–15 minutes of effective Savasana, you may experience:
- Slower, deeper breathing (6–8 breaths per minute vs. 12–20 at rest)
- Visible finger twitching or eye fluttering (signs of neuromuscular release)
- A feeling of warmth or heaviness in limbs
- Altered sense of time (5 minutes feels like 2, or 10 minutes like 30)
- A “sigh” or spontaneous deep breath upon coming out
Guided Breathing for Stress Reduction
While lying in Savasana, specific breathing techniques can deepen relaxation. Here are three simple methods to follow while in the pose.
Method 1 — Extended Exhale (most effective for stress)
- How: Inhale for 4 seconds → exhale for 6–8 seconds.
- Rhythm: Make the exhale at least 1.5x longer than the inhale.
- Why: Long exhales activate the parasympathetic nervous system directly via stretch receptors in the lungs.
- Duration: 3–5 minutes, then return to natural breath.
Method 2 — Diaphragmatic (Belly) Breathing
- How: Place one hand on your belly, one on your chest. Breathe so that only the belly hand rises and falls. The chest hand remains still.
- Why: Shallow chest breathing is a hallmark of stress. Belly breathing reverses this pattern.
- Duration: 2–5 minutes, or throughout the entire Savasana.
Method 3 — 4-7-8 Breath (for anxiety or racing thoughts)
- How:
- Inhale through nose for 4 seconds
- Hold breath for 7 seconds
- Exhale through mouth (soft “whoosh”) for 8 seconds
- Why: The extended hold and long exhale act as a “brake pedal” on the sympathetic nervous system. Often lowers heart rate within 1–2 cycles.
- Important: Do no more than 4–8 cycles in a row. If you feel lightheaded, return to natural breathing.
Guided audio script (read slowly to yourself or a student):
“Close your eyes. Feel your body resting on the floor. Notice where you make contact — heels, calves, hips, shoulder blades, back of the head. Allow your weight to sink completely into the surface beneath you.
Now bring attention to your breath. Don’t change it — just notice. Is it shallow or deep? Fast or slow?
On your next exhale, let out a soft sigh. Good. Now begin to lengthen your exhales just slightly — inhale naturally, then exhale a little longer.
If your mind wanders, that’s fine. Just come back to the breath. No judgment.
For the next 2 minutes, allow your body to breathe itself. You have nothing to do, nowhere to go. Just rest.”
To exit Savasana properly (often skipped — very important):
- Begin to deepen your breath.
- Gently wiggle your fingers and toes.
- Bend your knees, placing feet flat on the floor.
- Roll slowly onto your right side (helps maintain stable blood pressure).
- Rest for 3 breaths in fetal position.
- Use your left hand to press yourself up to sitting, head coming up last.
- Sit quietly for a few breaths before opening your eyes.
Final note: If you fall asleep in Savasana, do not judge yourself. Your body needed rest. Over time, with practice, you will learn to remain conscious while fully relaxed — this is the state of “yogic sleep” (yoga nidra), which is even more restorative than regular sleep.
FAQ
Q1: How long should I hold each pose for stress relief?
- Child’s Pose: 5–15 breaths (1–3 minutes)
- Cat-Cow: 5–10 slow rounds (1–2 minutes)
- Seated Forward Fold: 8–12 breaths (2–3 minutes)
- Legs-Up-the-Wall: 8–12 minutes (optimal for nervous system)
- Butterfly Pose: 8–15 breaths (1–3 minutes)
- Standing Forward Bend: 5–10 breaths (30–90 seconds)
- Corpse Pose (Savasana): 5–15 minutes
General rule: Longer holds (8–15 minutes) are better for deep stress relief. Shorter holds (1–3 minutes) work for quick resets.
Q2: What if I feel pain or discomfort during a pose?
Stop immediately if you feel sharp, stabbing, or joint pain.
- Mild stretching sensation = OK and expected
- Burning, pinching, or numbness = Stop or modify
- Dizziness = Come out slowly, bend knees, sit down
Quick fixes:
- Use props (blankets, blocks, straps, folded towels)
- Back off the depth of the stretch
- Try the “beginner modification” listed for each pose
- Skip the pose entirely if pain persists
Never bounce, force, or push through pain. Yoga should feel soothing, not punishing.
Q3: Can a beginner do all these poses safely?
Yes — with modifications. Every pose above includes beginner tips.
For absolute beginners, start with these three safest poses:
- Child’s Pose (knees wide, blanket under hips)
- Legs-Up-the-Wall (no weight-bearing, fully supported)
- Corpse Pose (lying down, nothing to do)
Avoid starting with (until you have basic body awareness):
- Standing Forward Bend (risk of hamstring strain if done incorrectly)
- Seated Forward Fold (easy to round the lower back)
Golden rule: If you can’t do the pose without strain, use the modification or skip it. Progress comes from consistency, not intensity
How Often Should You Practice?
Even 10–15 minutes a day is enough to feel the benefits. Consistency matters more than duration. Listen to your body and take rest days when needed.
Beginner Yoga Routine (10–15 Minutes)
- Breathing: 2 minutes
- Cat–Cow: 1 minute
- Child’s Pose: 2 minutes
- Butterfly Pose: 2 minutes
- Seated Forward Bend: 2 minutes
- Supine Twist: 2 minutes
- Relaxation: 2–3 minutes
Final Thoughts
Gentle yoga is a beautiful way to care for your body and mind. It helps you slow down, feel calmer, and become more flexible over time. Start where you are, move with kindness, and enjoy the journey.
✨ Breathe, stretch, and relax—one gentle pose at a time.
🧘♀️ YOGA & WELLNESS PLANNER
10 pages bundle · daily rituals · mindful tracker · printable
Morning Yoga Flow
Evening Wind-Down
Daily Intention Setter
Hydration & Habit Tracker
Gratitude Log
Pose Library (10 asanas)
Weekly Wellness Schedule
Mindful Eating Check-in
Sleep & Energy Tracker
Monthly Reflection + Goals